Sunday, June 26, 2016

Golden Fried Wheat Belly Chicken And Broccoli-Cheese Casserole

Tonight's "Wheat Belly" effort was a grand slam success!  We both wanted "fried chicken", so, I bought some organic Chicken Tenders, dredged them in egg and some All-Purpose Baking Mix (see page 19 in the "Wheat Belly 30 Minute (or less) Cookbook") with a little added salt, pepper, and a dash of flaxseed-meal, and fried as normal.

This concoction, for the most part, was my own creation, but you can do most anything you want "breaded" with the mix!  Guess that's why Dr. Davis calls it "all-purpose"!

While I was preparing to fry my "breaded" chicken in coconut oil, Judy made the Broccoli-Cheese Casserole on page 191 of the "Wheat Belly 30 Minute (or less) Cookbook". 

The recipe is as follows:
  • 1 bag (12 oz.) fresh broccoli (we used frozen)
  • 1/2 cup water
  • 2 eggs
  • 1 cup shredded sharp Cheddar Cheese (divided)
  • 1/2 cup heavy cream
  • 1/3 cup almond meal/flour (we were out, so we used coconut flour)
  • 1/2 teaspoon mustard powder
  • 1/4 teaspoon onion powder
  • 1/4 teaspoon sea salt
  • Dash of red pepper (we used two dashes)
Preheat the oven to 400F.  Grease an 8X8 baking dish.

In a microwaveable bowl, place the broccoli florets and water, cover, and microwave on high for 3 minutes, or until the broccoli is bright green and softened (or in our case thawed).  Drain and place in baking dish.

In a medium bowl, combine the eggs, 1/2 cup of cheese, the cream, almond meal/flour, mustard, onion powder, salt, and red pepper.  Pour over the broccoli.  Top with the remaining cheese.

Bake for 20 minutes, or until a knife inserted in the corner comes out clean.  For us it took 30 minutes.

As this cooked, I dipped the chicken tenders in beaten egg, rolled it in the baking mix, then put it back in the egg, and rolled it the second time.  In about 15 to 20 minutes (depending on the thickness of the pieces) the chicken is done and ready to eat.

Now plate the "fried chicken"  with the broccoli-cheese casserole and serve.  It was wonderful!

Friday, June 24, 2016

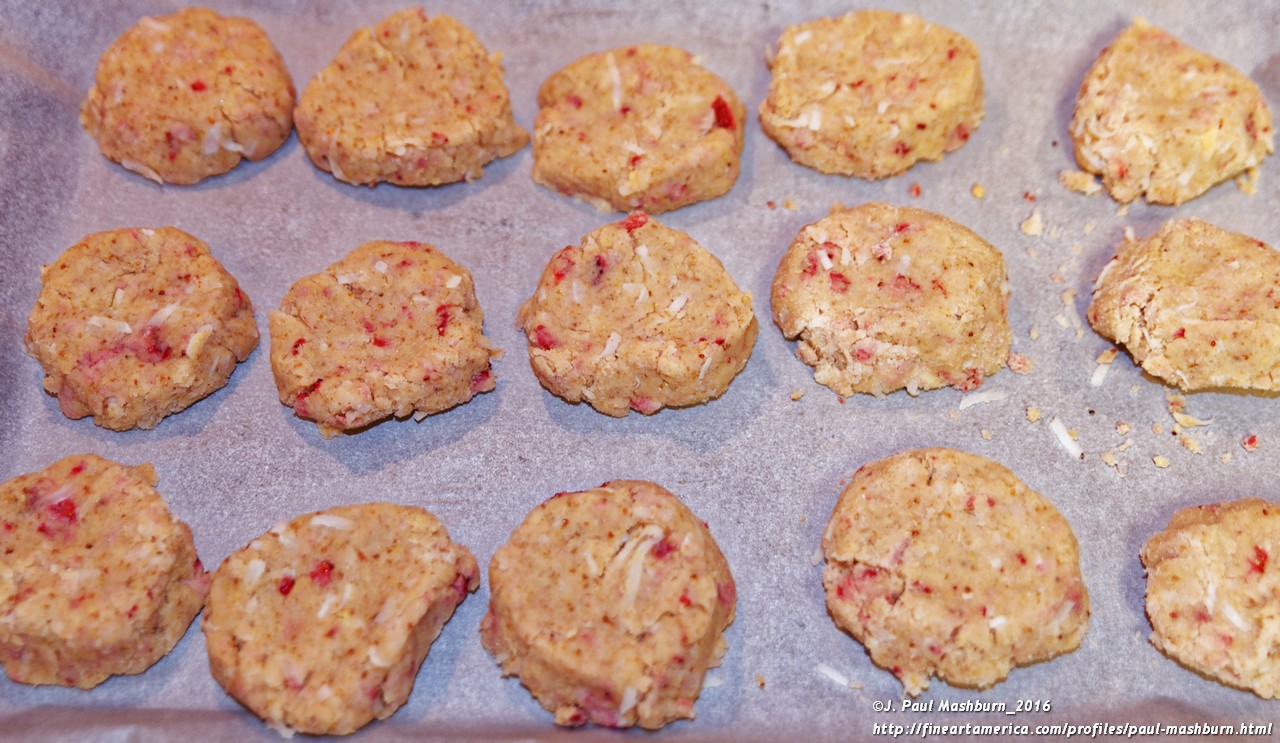
Strawberry-Coconut Biscuits Not A Success!

So you don't get the idea that everything we've tried is a success, I'm posting our efforts on the Strawberry-Coconut Biscuit recipe on page 80, of Dr. Davis' "Wheat Belly 30-Minute (or less) Cookbook".

I'm not going to waste your time or space here posting the entire recipe, but, suffice it to say, we did follow the directions as written.  After 17 minutes in the oven they came out dry and flaky, too crumbly to pickup and hold!

I even re-crumbled the mixture, added another egg, and some coconut milk, trying to add a bit more moisture.  After cooking another 20 minutes at a lower temperature, the biscuits came out the same.  We discarded them!

They did smell great, and though dry, tasted great, but just too powdery to use.

Maybe someone can post what went wrong...I'd love to know.  I'd really like to try these for breakfast!

My Typical "Wheat Belly" Breakfast

This is my typical "Wheat Belly" breakfast, although I change the protein often; usually black forest ham or bacon. On the side is a piece of the Herbed Focaccia Flatbread I made a few days ago.

I like the eggs runny; there are two here. Underneath, I sometimes put a piece of cheese.  You don't have to worry about "fat" on this program so much, so bacon fat stays on and I cook the eggs in coconut oil.

The orange spots are hot sauce! 

I find this breakfast can often last me all day; unless I'm digging a ditch!

Tuesday, June 21, 2016

Herbed Focaccia Flatbread - Wheat Belly Friendly

This recipe (from Dr. Davis' "Wheat Belly 30-Minute (or less) Cookbook, page 22) provides an unusually sturdy focaccia bread suitable for a variety of dishes. Delicious!

Shape this focaccia dough into whatever shape suits your recipes. I usually make two focaccias, each approximately three inches wide by six inches long and 1/2-3/4 inches deep, to use as the two bread slices to sandwich ingredients between. However, this recipe yields such an incredibly filling bread that the two slices can easily be cut in half to yield two very satisfying sandwiches to serve two.

Ingredients:
2 cups almond meal (this online version is slightly different from the book, so check closely)
1 cup shredded mozzarella or other cheese
1 teaspoon sea salt
1½ teaspoons dried rosemary
1½ teaspoons dried oregano
1 teaspoon onion powder
½ teaspoon garlic powder
¼ cup sundried tomatoes, finely sliced
2 large eggs, separated
3 tablespoons extra-virgin oil

Preheat oven to 350° F.

In food chopper or food processor, pulse shredded cheese until reduced to small granule-sized consistency, similar to couscous.

In medium bowl, combine almond meal, cheese, sea salt, rosemary, oregano, onion powder, garlic powder, and sundried tomatoes and mix together. Set aside.

With electric mixer, whip egg whites until stiff. Blend in egg yolks and 2 tablespoons olive oil at low speed. Pour egg mixture into almond meal mixture and mix together.

Divide dough in two and form into desired shape by hand. Smooth edges with knife or spoon. (You may need to place your knife or spoon under hot running water to help mold the dough.)

Bake for 15 minutes. Remove and take blunt handle of spoon or other small rounded instrument and make small depressions in the surface every inch or so. Brush surface with remaining olive oil and sprinkle some sea salt on top.

Return to oven additional 15 minutes.

Monday, June 20, 2016

Easy Blueberry Cobbler - From Wheat-Free Market Foods

This is my wife's great interpretation of the Wheat-Free Market Food's blueberry cobbler!
Serves 6

Here is a quick and simple way to make a nice hot dessert that you can top with some whipping cream or low-carb ice cream.

Ingredients:
  • 2 cups frozen blueberries
  • 3-1/2 tablespoons Wheat Free Market Sweetener, divided
  • ¾ cup Wheat-Free Market All-Purpose Baking Mix
  • 3 tablespoons salted butter, melted
Preheat oven to 350 degrees F. Add blueberries to the bottom of a pie pan. In a small bowl, blend the baking mix with 2 tablespoons of sweetener then evenly pour on top of blueberries. Drizzle melted butter over cobbler followed by the remaining 1-1/2 tablespoons of sweetener.

Bake for 30 minutes or until blueberries are bubbly and the cobbler begins to brown. Then turn oven to broil and allow cobbler to brown a bit more. Do not burn.

Let cobbler sit at least 5 minutes to allow crust to set. Serve with low carb ice cream or whipped cream!

The cobbler should have just about 5-6 net carbs per serving!

Friday, June 10, 2016

Fried Pork Tenderloin Fit For A "Wheat Belly"!

This is one of the first recipes I tried from Dr. William Davis' "Wheat Belly 30 Minute (or less!) Cookbook, page 133, and it's one of my favorites, because it gives me back my former love; rice!  Well, kind of.

To give up all grains means more than just the wheat, it includes, among other things, rice and oats, which are seeds of grass...therefore, grain.  I miss rice.  It was as much a staple to me as was pasta...two things a Type 2 diabetic don't need.  Like a baked potato, it all turns to "sugar" in the body.

However, I quickly found a substitute; cauliflower!  It mimics rice to a "T" and the brain is fooled into thinking it's eating rice.  I really discovered this years ago when I was trying to give up the carbs in potatoes.  Ruby Tuesday used to offer, don't know if they still do or not, a cauliflower dish that made your brain think it was eating mashed potatoes.

Back to the recipe.  Tonight we tag-teamed "Pork Fried 'Rice'", and had it on the table in about 20 minutes.

The book says you need these ingredients on hand:
  • 1 head of cauliflower (we grated ours to the consistency of, what else, rice)
  • 2 TBS coconut oil (actually used Extra Virgin olive oil)
  • 4 scallions (I used green onions)
  • 2 cloves of garlic, minced
  • 2 eggs, whisked
  • 1/2 pound pork tenderloin (cut into 1/2" cubes - However, I've tried it thinly sliced and kind of prefer it that way.  Seems to be more tender that way.)
  • 1/4 cup tamari or gluten-free soy sauce
Put the grated/shredded cauliflower in a microwaveable bowl, and cook covered on high for 4 minutes, stirring once (or until desired doneness).

Meanwhile, in a WOK, or large skillet, heat 1 tablespoon of oil until hot.  Cook the scallions or onions and garlic for 2 minutes.  Add in the whisked eggs and stir continuously until cooked and lightly brown.  Set aside in separate bowl.

Reduce the heat to medium, add 1 tablespoon of oil to the WOK, and cook the pork until no longer pink.  Stir in the soy sauce, steamed cauliflower, and the egg mixture.  Cook, stirring, for 2 minutes, or until heated through.

If you like a lot of salt you can add a little to the eggs, but believe me, the soy sauce adds a lot of salt taste!  So, be careful.

Serve!  Enjoy!

Friday, June 03, 2016

Pizza For Wheat Bellies!

Wow!  This "Wheat Belly" friendly pizza is fantastic!

I didn't use a cast iron skillet like Wheat-Free Market Foods did in cooking their recipe, but whether you use a skillet and have ticket crust, or you use a flat pizza pan and thin crust, it's going to be delicious!
I followed the directions as outlined on the package of "Wheat Belly Pizza Crust Mix" in making the crust, but I added toppings that were more keeping with the online version, except I used Canadian Bacon instead of sausage.  Mine was a thin-crust, but I didn't have enough mixture to completely spread on the entire pizza pan.  However, what I made was outstanding!  It tasted so good, and filled that part of me that wanted to taste pizza.
Whether you follow the packing directions, or the ones below from the THIS LINK, you, and your "Wheat Belly" will be satisfied.

Serves 4


2 teaspoons olive oil for pan
1 cup
Wheat-Free Market Wheat Belly Pizza Crust Mix
2 tablespoons grated parmesan cheese
¼ teaspoon sea salt
1 tablespoon dried Italian Seasoning
¼ cup salted butter, melted
2 large eggs
2 tablespoons milk
4 oz. mozzarella or sharp cheddar cheese, shredded

Toppings

½ lb. Italian bulk sausage (I substituted Canadian Bacon)
½ small onion, chopped
½ bell pepper, chopped
¼ cup favorite sugar-free pizza sauce (optional - the lowest sugar content I could find was 2g, but I'll keep looking for sugar-free)
Other topping suggestions: Pepperoni, bacon crumbles and sliced olives (I added diced jalapeños)
4 oz. mozzarella cheese, shredded

Preheat oven to
400 degrees F. Oil the bottom and sides of a large cast iron skillet (approximately 10-11 inches) or the bottom of a pizza pan with olive oil.

In a medium bowl combine the pizza mix, parmesan cheese, salt and Italian seasonings. Then stir in the butter, eggs, milk and 4 oz. of cheese until a thick dough forms.
Using a spatula and wet hands, press the dough evenly into the prepared pan, going at least 1 inch up the sides. Note: If using a pizza pan, just press the mixture out into a 12 inch diameter circle. [I put my mixture between two sheets of wax paper and pressed it out for thin crust.]
Bake for 22-25 minutes or until golden brown. While dough is cooking, prepare the toppings.

Brown the sausage in a medium frying pan, being sure to break it into smaller pieces. Approximately halfway through cooking the sausage, add the onion and bell pepper and cook until the sausage is done.

Once the crust and sausage mixture are done, turn oven to broil and top the crust with the sausage mixture followed by the pizza sauce and cheese. Place pizza under the broiler until cheese has melted and slightly browned.

PREPARE FOR AN EXPERIENCE
YOU'VE BEEN MISSING!

Wednesday, June 01, 2016

Bacon, Egg, and Tomato Stacks - Wheat Belly

So what's for breakfast for a "Wheat Belly"? 

Here's one light idea from page 63 of Dr. William Davis' "Wheat Belly 30-minute (or less) Cookbook":

His cookbook suggests this when you're hankering for something a little different for breakfast.  It's a departure from the usual scrambled or fried eggs!
First off, cook a slice of bacon for each "tomato stack" you intend to make.  We cooked three pieces because my wife only wanted one egg.  I, obviously, wanted two!  Cook any way you want, and sit aside until the eggs are ready.

I'm not going to complicate this by listing a lot of ingredients, suffice it to say it's too simple! 

On a slightly greased baking sheet, place a large sliced (the book recommends 1/2" slices) tomato; one for each slice of bacon you intend to have.  Drizzle each slice with olive oil and sprinkle with Parmesan cheese, and broil for 3 to 4 minutes (until lightly brown).

Place the slices on a plate, crisscross each with a piece of bacon, and move on to the eggs.
The hard part may be in preparing the poached eggs, but it involves gently putting eggs into 2" of water that contains 3 tablespoons of white vinegar.  You will note that my water was dark in color, but I used apple cider vinegar because that's all I had.  However, it worked fine! 

Cook the eggs until they have the consistency you prefer...mine tend to be runny, but you can judge for yourself.
Place an egg (using a slotted spoon and dry under the spoon before moving over the tomatoes) on each of the slices. 

Season with salt and pepper (use some chives if you want).  Enjoy!

Monday, May 30, 2016

Cheeseburger Pie For Wheat Bellies!

Man!  I tried this recipe from Wheat-Free Market Foods, and I believe it's the best thing I've made and had yet! 

I was also down to 197 (from 225+), and completely off my blood pressure med!  I'm also not taking my metformin, but I'm still monitoring my blood sugar levels periodically.  I don't want to announce that I'm good that until I have my next A1C test.

Here's the recipe just like I found it on the website above.  You can also order all the "wheat-free/grain-free" ingredients from them.

Serves 6

1 lb. ground meat
½ large onion, chopped
½ - 1 tablespoon favorite Cajun Seasoning (optional...or instead use a dash of salt and pepper)
2 tablespoons chicken or beef stock or water
4 oz. cream cheese
¾ cup
Wheat-Free Market All-Purpose Baking Mix
2 tablespoons salted butter, melted
2 large eggs
2 tablespoons sour cream
½ cup shredded sharp cheddar cheese
Extra shredded cheese (approximately 2 tablespoons)

Preheat oven to 350 degrees F. In a large pan over medium heat brown the ground meat and onion. As soon as meat has cooked and onions are tender (drain excessive oil if desired) add ½ tablespoon of Cajun seasoning, cream cheese and stock. Lower heat and stir until cream cheese has melted. Taste for seasoning and add more if needed. Pour meat mixture into an 8 or 9 inch pie plate.

In medium bowl blend the baking mix, eggs, sour cream, butter, and cheddar cheese. Pour batter over meat mixture and spread out evenly. Top with additional cheese and bake for 25 minutes or until biscuit layer begins to brown.

Let sit 5 minutes before serving.

Serve with sliced tomatoes or salad.

We also added a few Terra Exotic Potato Chips on the side.  They gluten-free and contain no wheat!


Saturday, May 28, 2016

Gluten Free - Spaghetti - Wheat Belly Friendly

If you have been missing a pasta-like dish, here is an easy way to have the same taste and consistency as a "traditional" plate of spaghetti!

First, cook some hamburger like you would normally for a traditional spaghetti meal, except don't pour off all the fat.  Pour in a gluten-free spaghetti sauce like Monte Bene. 

I used just half a jar of their "garlic and marinara" and was very pleased with the taste.  We did add a little Mrs. Dash to kick it up a notch!


Using a "noodle maker" tool, like, or similar, the one shown and twist off some zucchini, and or squash, noodles.  It's so easy!

Boil the "noodle" for about 2 minutes in some beef stock.  Drain, and put them into your spaghetti mixture.

Stir and cook until well blended and then plate.  Add real grated parmesan to the top and serve.

Note: There are gluten-free wines out there, so have a small glass with your spaghetti.* 

You'll never have to miss "pasta" again!

*I haven't shopped for wine in sometime, but amazingly the operator was aware of "gluten-free" alcohol.  He showed me wines, vodkas, and even Tennessee whiskey that were "Wheat Belly" friendly, and some even had "gluten-free" on their labels.  Moderation is the key, and you should read the labels of everything you buy.

Friday, May 27, 2016

Breakfast Quiche - Mushroom - Bacon - Cheese - Wheat Belly Friendly

Let me say right up front that this "Wheat Belly" friendly breakfast quiche is AWESOME, but time consuming!  So, you may want to prepare the whole thing the night before, or at least get all the mixtures ready.  Or, you could work hungry as I did on this, but the effort, either way is well worth it!

It really helps if you have a helper on this one, there is a lot of mixing and finding ingredients.  However, once you've done it once, you'll be able to do it quicker on those hungry mornings!

This recipe came from Wheat-Free Market Foods, and this is my attempt at preparing.


Divide your activity into preparing the crust and the filling.  The are bought time consuming and are made up of several ingredients.  The ingredients should be on hand, IF, you have been following Dr. Davis' "Wheat Belly" program.  The crust is basically made up of the "Wheat-Free All-Purpose Baking Mix" that I usually keep made up in a canister.  You need his cookbook to get the ingredients of that mixture.  HINT: Breads are made from Almond, coconut, and flaxseed flours/meals. NO WHEAT!

The CRUST is made up of: (turn on oven to 350)
1 -1/2 Cups Wheat-Free Baking Mix
1/4 teaspoon sea-salt
1 teaspoon Virtue or Truvia sweetener (only Stevia extract, no other ingredients are "wheat belly" legal)
1 large egg
2 tablespoons of "real" butter

The FILLING is made up of:
4 slices of thick bacon (chopped)
1/2 small onion (finely chopped)
4 ounces of mushrooms (chopped)
1/2 teaspoon sea-salt
5 large eggs
3/4 cups heavy whipping cream
4 ounces shredded cheese (provolone or Swiss)
1/4 teaspoon black pepper

Prepare Crust:
Preheat oven to 350 degrees F. In a medium bowl combine baking mix, sweetener, salt, butter and egg. Blend until dough forms. Place dough on a large piece of parchment paper. Place another sheet of parchment paper (or plastic wrap) on top of the dough and roll out until dough is approximately 12 inches in diameter (for a 9 inch pie). Remove top paper and carefully invert crust into pie plate. Remove any excess dough and crimp edges if desired.


Bake crust for 10 minutes then remove from oven.

While crust is baking, prepare filling.

Render fat from bacon in a medium pan. As soon as bacon is crispy, chop bacon and set aside. Leave at least 3 tablespoons of bacon drippings in pan and add onion, mushrooms and ¼ teaspoon salt. Cook over medium heat until vegetables are tender. Turn off heat.

In a large bowl add eggs, whipping cream, cheese, remaining ¼ teaspoon salt, pepper, bacon and mushroom mixture. Pour mixture into the pre-baked crust and bake for 35 minutes or until center is set. Check crust around 30 minutes to make sure it is not getting too brown. Allow to cool for at least 10 minutes before slicing.

Get ready to "slap yo mamma"!  It's awesome with coffee, and maybe a side of fresh fruit!

Pork Chop - Wheat Belly Meal

A lot of the "Wheat Belly" meals we've been fixing for our evening meal have been similar; only the protein has changed.  That makes it interesting, without burning you out on just one thing.

In this one we fixed the same zucchini and summer squash, leaving out the tomatoes and adding Brussel Sprouts, and just baked a couple of nice size pork chops.  It is quick and easy, and very satisfying!

Look at the "Roasted zucchini and Squash" recipe below for the "how to". 

As for the pork chop, simply season the meat, and place in the oven at 350 until nice and brown; usually about 20 minutes.  My wife covers mine with foil, because I don't like mine as "killed" as she does!

I'm losing more slowly now, possibly because of too many carbs from vegetables, but I was told not to lose too much more.  That's a good sign from your wife that your getting to where you need to be!

Wednesday, May 25, 2016

Roasted Zucchini, Squash, and Tomato Medley - Wheat Belly

Continuing on with the Wheat Belly program, my wife cooked this for me tonight, in honor of my 70th birthday!

We love the convenience and taste of a good Rotisserie Chicken, which is great protein for a Wheat Belly eating program.  For the side, my wife prepared the "Roasted Zucchini, Squash, and Tomato Medley" from page 131 of Dr. William Davis' "Wheat Belly 30-Minute (or less) Cookbook".

I never knew how great zucchini, squash, and tomatoes could taste roasted, and it goes with any kind of main dish; chicken, fish, or pork!

She cut up the vegetables in bite size half-moon pieces, while heating the oven to 425 degrees.  If the chicken needs to be heated, put in an aluminum pan or on a baking sheet, cover with foil, and place in the oven.

In a bowl put 1 1/2-TBS olive oil, 1-TBS red wine vinegar, 1/2-TS of the "Wheat Belly" Italian Seasoning Mix (2-TBS dried basil, 2-TBS dried oregano, 2-TBS dried rosemary, 1-TBS dried marjoram, 1-TBS garlic powder, and 1-TS ground black pepper, and 1/2-TS of sea salt, and mixed thoroughly.

Toss in the vegetables and mix up until everything is coated.  Spread the vegetables on a grease cooking sheet and place in the oven for 20 minutes.  Stir once, or until brown.  Sprinkle with about 1/3 cup of finely shaved Parmesan cheese.

Serve it with any of the proteins mentioned above, or with chicken as the photo shows.

Eat up, you non-wheat bellies!

Tuesday, May 24, 2016

Shrimp And Greek Salad For Your Wheat Belly

Okay, if you've been following my progress on Dr. William Davis' "Wheat Belly" program, I weighed 199 today!  No more wheat (or grains of any kind) or sugar!

Tonight I pulled out an, almost forgotten, opened package of frozen shrimp.  I thought it might not be good, since it looked a little freezer burned, but turns out it was perfect!

While my wife sliced and diced making the cucumber, onion, tomato, Kalamata olive, and feta cheese salad (see this post for dressing), I got a pan of real "Amish" butter, minced garlic, and a splash of "Ring Of Fire" hot sauce heating on the stove.  After only rinsing the frozen shrimp off, I popped them into the hot mixture and began flipping them at intervals.  After some of the liquid boiled off, I sprinkled sea salt over the shrimp.

It only took about 10 to 12 minutes and the shrimp I tested was awesome!  I put the shrimps around the salad plate my wife had fixed and we sat down to a delicious meal.

I can't think of a think that is not allowed on the Wheat Belly program, so I feel certain I'm on my way to losing a few more pounds.

I never end a meal feeling bloated and I'm still off my metformin, and still down to half a blood pressure pill.  I'm hoping in another week I can stop it all together.  Next, I'll have to have my cholesterol checked...I may stop that medicine soon, as well!

Friday, May 20, 2016

Rotisserie Chicken And Broccoli-Cheese Casserole

My wife and I wanted a "Rotisserie Chicken" tonight, which was easy enough.  We picked out a good one from the store on our last trip and tonight was the night.

The question was, "What to fix with it that was 'Wheat Belly' friendly?"

My wife came up with and prepared the "Broccoli-Cheese Casserole" found on page 191 in Dr. William Davis' "Wheat Belly 30-minute (Or Less) Cookbook".

While the chicken was warming at 400 degrees in the oven, covered in an aluminum pan, she greased an 8" X 8" baking dish. 

In a microwavable bowl, she put the fresh broccoli florets (1 - 12 oz. bag) and 1/2 cup of water.  She covered the bowl and cooked for 3 minutes on high.  The florets should turn bright green and get soft in that amount of time.  If not, zap a little longer!

In a medium bowl, combine 2 eggs, 1/2 cup of cheddar cheese, 1/2 cup of heavy cream, 1/3 cup almond flour, 1/2 teaspoon of mustard powder, 1/4 teaspoon onion powder, 1/4 teaspoon of sea salt, and a dash of ground red pepper.  Pour mixture over the cooked broccoli, and top with another 1/2 cup of cheddar cheese.

Bake for 20-25 minutes!

The chicken will probably be warm through long before this time is up, but my wife always wants to make sure it's dead!

As you can see, from the photos above, it looked great, and tasted the same.

Come on...join the fun and cook "Wheat Belly" style!

Thursday, May 19, 2016

Salmon With Greek Salad For Wheat Bellies

So, I'm still eating according to "Wheat Belly" rules, but experimenting some too.

Tonight my wife prepared a "Greek Salad" according to our daughter's recipe.  She and her husband lived in Crete for over a year and that's where she fell in love with this type salad.

She cut up some cucumber, green onions, cherry tomatoes, and added a helping of Kalamata olives, and a handful of feta cheese.  Over the mixture she sprinkled some apple-cider vinegar, and extra virgin olive oil.  It alone was delicious.

I had bought two small salmon slices in the frozen section at the store, so according to directions I cooked them un-thawed for 30 minutes at 400 degrees.

I put a slab each on the side of the salad plates and we dug in!  Awesome!

The taste combination was just what I had wanted when I planned the meal.

I'm loving the weight falling off, and the new adventure in taste we get with the dishes we are preparing.  You'll love it too!

Jump in "cold turkey" and free yourself of that "grain" and "sugar" addiction today.
Related Posts with Thumbnails